Key takeaways
- For most home bakers, the best pastry blender for pie crust is a five-blade stainless-steel model about 10–13 centimeters wide with a comfortable, rigid handle. Choose the OXO Good Grips Dough Blender and Cutter when grip comfort matters most, the Spring Chef Dough Blender for…
The best pastry blender for pie crust is a medium-width, five-blade stainless-steel cutter with a rigid handle and enough clearance between the blades to break cold butter into pea-sized pieces without crushing the dough.
Our top picks
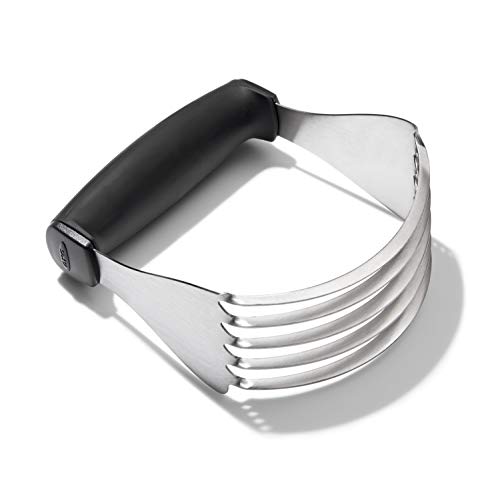


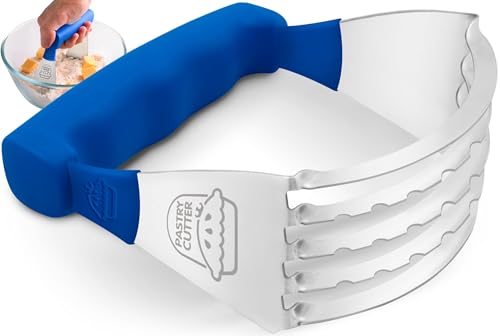
As an Amazon Associate we earn from qualifying purchases at no extra cost to you. Ratings are shown as listed on Amazon.
Quick picks for different pie-making needs
| Best for | Recommended type or model | Why it stands out | Typical price range |
|---|---|---|---|
| Most kitchens | OXO Good Grips Dough Blender and Cutter | Comfortable grip, sturdy stainless-steel blades, useful width | Usually $15–$25 |
| Frequent pie baking | Spring Chef Dough Blender | Rigid five-blade construction and a broad cutting span | Usually $12–$20 |
| Lowest-cost basic tool | Norpro five-blade pastry blender | Simple metal design with few parts to wear out | Usually $8–$15 |
| Small hands or limited grip strength | Soft-grip ergonomic pastry blender | Thicker handle reduces pressure on fingers and the palm | Usually $12–$25 |
What matters when cutting cold butter
A pastry blender has one job: cut solid fat into flour while leaving distinct pieces behind. Those pieces later create pockets of steam, which help produce a flaky crust. A tool that bends, slips, or forces you to press repeatedly can warm the butter and develop too much gluten before the dough is even hydrated.
Blade shape and spacing
Five narrow, curved or gently rounded blades are the most versatile design. They distribute pressure across several points, so butter is cut rather than smeared. Blades with a shallow curve work well for standard 9-inch pie plates because they move through a relatively thin layer of flour and butter.
Look for clearance of roughly 8–12 millimeters between adjacent blades. Very tight spacing can trap butter and flour, while widely spaced blades may require more passes. Rounded blade edges are preferable to knife-sharp edges: they cut cold butter effectively but are less likely to scrape a metal bowl aggressively.
Wire strength versus thin cutting edges
Wire pastry blenders can be lighter and inexpensive, but their performance depends heavily on wire diameter and how securely each wire is attached. Wires thinner than about 1.5 millimeters can flex when cutting a refrigerated block of butter. That flexing wastes pressure and can leave uneven chunks.
Rigid stamped or forged stainless-steel blades generally handle very cold butter better. The trade-off is that solid blades may feel heavier and can collect more dough at the joints. For a tool intended for weekly use, choose firmly fixed blades over an ultra-light design.
Grip comfort
The handle should be long enough for a full palm grip, normally about 10–12 centimeters, without forcing your knuckles into the bowl. A broad oval or rounded handle is more comfortable than a narrow cylindrical rod when you are cutting a double batch.
Soft silicone or rubberized handles improve control, especially if your hands are cold, floury, or affected by arthritis. Hard stainless-steel handles are easier to sanitize and may last longer, but they can feel uncomfortable when substantial downward pressure is needed.
Tool width and bowl size
A working width of approximately 10–13 centimeters suits most home recipes. It covers enough area to cut butter efficiently in a medium mixing bowl without striking the sides on every pass. A narrow tool around 8 centimeters is easier to maneuver in a small bowl but takes longer for a double crust.
For a 9-inch pie, a standard five-blade blender is usually sufficient. For two crusts or a large batch, a wider tool can save time, provided it fits inside your bowl. Before buying, compare the blender’s width with the bowl’s interior diameter: leave at least 2–3 centimeters of clearance on each side so you can rock the tool rather than scrape the rim.
Head-to-head: the leading designs
OXO Good Grips Dough Blender and Cutter
The OXO design is a strong all-purpose choice because its thick, comfortable handle makes repeated downward strokes less tiring. Its five stainless-steel blades are arranged with enough separation for butter to pass through rather than forming a solid plug between the cutters. The handle is usually the deciding advantage for people who make pie dough often or have limited hand strength.
Its main drawback is cleaning around the blade-to-handle connection. Rinse it soon after use, before butter and flour dry in the seams. It is a good fit for a 9-inch pie, biscuits, crumble toppings, and small batches of shortcrust pastry.
Spring Chef Dough Blender
The Spring Chef tool uses a broad five-blade layout intended to cover more dough with each pass. Its rigid construction is useful when butter is very cold or cut into cubes larger than 1 centimeter. The broad span can reduce mixing time, but it may feel crowded in a small 2-quart bowl.
Choose this style if you regularly prepare double-crust pies or want a tool that can also cut shortening into flour. Check that the handle remains firmly aligned with the blade frame; a slight twist at this connection becomes noticeable when working dense dough.
Norpro five-blade pastry blender
A basic Norpro five-blade blender is a practical budget option. Its uncomplicated metal construction has no moving parts, electronics, or detachable pieces, so there is little to fail. It is especially suitable for occasional bakers who want a dedicated cutter instead of using two table knives.
The compromise is comfort. Basic metal handles can be narrower and less cushioned than premium ergonomic versions. If you make several pies in one session, hand fatigue may outweigh the initial savings.
Wire pastry blenders
Wire models are often lighter and easier to rinse because there is less solid surface for dough to cling to. They can work well with softened butter, shortening, or small batches. For cold butter straight from a refrigerator at roughly 2–5°C, however, choose wires that feel rigid when pressed sideways. If the wires bow visibly, the tool is more likely to mash than cut.
Decision guide by baking situation
| Your situation | Best specification | Why |
|---|---|---|
| Small apartment kitchen | 8–10 cm width; five blades; compact handle | Fits smaller 1.5–2-quart bowls and takes little drawer space |
| Frequent double-crust baking | 11–13 cm width; rigid stainless-steel blades | Cuts a larger flour-and-butter area with fewer passes |
| Kids and pets in the kitchen | Rounded edges; sturdy one-piece or firmly joined construction | Less exposed sharp metal and fewer detachable parts |
| Arthritis or weak grip | 10–12 cm soft-grip handle; broad palm contact | Reduces the force concentrated in the fingers |
| Renter or shared kitchen | Dishwasher-safe stainless steel with no wooden parts | Simple sanitation and less concern about finish damage |
Cleaning and durability realities
Butter blenders are easy to clean only when they are rinsed promptly. A five-blade frame can trap flour in the handle joint, so soak it briefly in warm water and brush between the blades with a dish brush. Dishwasher-safe stainless steel is convenient, but repeated high heat can shorten the life of soft-touch coatings or loosen adhesive in some handles. Follow the maker’s care instructions rather than assuming every rubberized grip is dishwasher-safe.
The parts most likely to wear first are the handle coating, the blade frame, and the connection where the frame enters the handle. Avoid twisting the tool sideways or using it to crush frozen butter. Cut butter into cubes about 1–1.5 centimeters wide first; this protects the tool and produces more even pieces.
How to use a pastry blender without overworking the dough
- Chill the butter until firm, then cut it into evenly sized cubes.
- Combine the flour, salt, and other dry ingredients before adding the butter.
- Press the blender straight down and lift it rather than grinding it back and forth.
- Rotate the bowl every few strokes so the tool reaches the entire mixture.
- Stop when the largest butter pieces are about the size of peas, with some smaller crumbs.
- Add cold liquid gradually and switch to a fork or hands for the final brief fold.
For a flaky crust, do not aim for a perfectly uniform mixture. Visible butter pieces are useful. If the dough begins to look greasy, sticky, or smooth before liquid is added, it has probably been worked too long or allowed to warm.
Bottom line
For most home bakers, the best pastry blender for pie crust is a five-blade stainless-steel model about 10–13 centimeters wide with a comfortable, rigid handle. Choose the OXO Good Grips Dough Blender and Cutter when grip comfort matters most, the Spring Chef Dough Blender for frequent larger batches, or a basic Norpro five-blade model when low cost and simple construction are the priority. Whatever the brand, firm blades, useful spacing, and easy-to-clean joints matter more than decorative features.