Key takeaways
- Trace hook outlines lightly in pencil once you’re happy with placement, so items return to the same spot.
- Seal raw hardboard with primer and paint on both faces before hanging; it resists moisture and takes fingerprints far less readily.
- Slip a scrap of cardboard behind the panel while drilling into drywall to catch dust.
- Keep four to six spare hooks on hand — layouts always evolve within the first month.
What's inside
Pegboard has quietly graduated from the garage wall to the design conversation. Strip it of its hardware-store associations and what you have is a modular grid — a wall that adapts as your needs shift, which is exactly what small apartments, hybrid offices, and pantries that never quite fit their contents have been asking for. The 2026 crop of panels leans metal rather than hardboard, powder-coated in matte black or soft white, with slimmer profiles and cleaner edges that read as intentional rather than improvised.
The catch is that pegboard is one of those projects where the outcome hinges almost entirely on the first twenty minutes. Hole size, clearance behind the panel, and where your studs actually sit will determine whether your wall holds a cast iron skillet or sags under a set of measuring spoons. Below, we walk through the sequence that professional installers follow, the mounting decisions that matter most, and how to pick panels and accessories that work together instead of against each other.
As an Amazon Associate we earn from qualifying purchases.


Match the Hole Size Before Anything Else
Pegboard comes in two standard hole diameters: 1/8 inch and 1/4 inch. The smaller grid suits craft supplies, jewelry, spice jars, and light office gear. The 1/4 inch grid accepts heavier-gauge hooks and is what you want for hand tools, cordless drills, and anything with real mass. Confirm the diameter on the panel spec sheet, then buy accessories to suit — a versatile assortment like the INCLY 278-piece kit explicitly fits both sizes, which is useful if you’re mixing panel types across a room. Buying hooks first and panels second is the most common way this project goes sideways.
Leave Air Behind the Panel
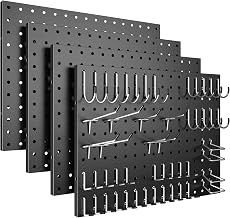
Hooks work by dropping through the hole and hooking back behind the board. Mount a panel flat against drywall and there’s nowhere for that hook to seat, so nothing stays put. You need roughly half an inch of clearance minimum. Metal systems solve this for you: the Wall Control 4 ft. metal pegboard kit and most of the current four-pack panels, including the Spampur set and the 110-piece heavy duty kit, ship with integrated standoffs or a formed return edge. Traditional hardboard needs help — 1×2 or 1×3 furring strips run vertically at each stud line, or spacer blocks behind every mounting screw.
Find the Structure, Then Choose Your Fasteners
Run a stud finder across the wall and mark centers in pencil; in most homes they sit 16 inches apart. Fastening into studs is always the stronger option and non-negotiable for anything holding tools. If your layout falls between studs, use toggle bolts or self-drilling drywall anchors rated well above your intended load, and spread the weight across more mounting points than the instructions require. For masonry or concrete block, switch to a masonry bit and sleeve anchors. Lightweight decorative panels — the kind sold as easy-to-install four-piece sets for a bathroom or study — can sometimes go up on heavy-duty adhesive strips, but treat that as a display-only solution.
Dry-Fit and Level Before You Commit
Lay the panels on the floor in the arrangement you intend, and take a photo. Multi-panel kits like the white 66-piece office set are designed to tile into a continuous grid, but only if the hole spacing lines up across the seams — a quarter inch of drift is visible from across the room. Mark your first panel’s top edge with a level, set that one perfectly, and index everything else off it. Mount at a height where the most-used items land between chest and eye level, generally 40 to 60 inches from the floor for a garage wall and slightly lower over a desk or workbench.
Load It With Intent
Once the grid is up, resist filling every hole. The visual appeal of pegboard comes from negative space and repetition, so group items into zones with breathing room between them. Bins handle small loose parts far better than hooks. Hook locks — included in kits like the 110-piece metal set — clip hooks in place so they don’t lift out when you grab a tool, which is the difference between a system that stays organized and one you re-hang monthly.
Tips
- Trace hook outlines lightly in pencil once you’re happy with placement, so items return to the same spot.
- Seal raw hardboard with primer and paint on both faces before hanging; it resists moisture and takes fingerprints far less readily.
- Slip a scrap of cardboard behind the panel while drilling into drywall to catch dust.
- Keep four to six spare hooks on hand — layouts always evolve within the first month.
Frequently Asked Questions
How much weight can a pegboard hold?
Metal panels mounted into studs commonly support 30 to 50 pounds per panel, sometimes more. Hardboard on furring strips handles considerably less, and anchor-only installations in drywall are the weakest link. Always check the manufacturer’s stated rating.
Can I install pegboard on my own without a helper?
Yes for single panels under about 2 feet. For 4-foot sections, drive a temporary screw into a stud to rest the bottom edge on while you position and level the top.
Do metal panels really beat hardboard?
For load capacity, durability, and appearance, generally yes. Hardboard remains cheaper and easier to cut to odd dimensions, which still makes it the pragmatic choice for large workshop walls.
Will this damage a rental wall?
Screw holes patch and paint easily. If your lease is strict, mount the panel to a plywood backer and lean or French-cleat it instead of drilling the grid directly.
Conclusion
A pegboard wall earns its place by being genuinely flexible, but that flexibility depends on getting the fundamentals right: the correct hole size for your gear, real clearance behind the panel, and fasteners anchored into something structural. Choose a system with integrated standoffs and matching accessories, take your time with the first panel, and the wall will keep adapting to you for years.