Key takeaways
- Use a laser level to align multiple panels horizontally — even a quarter-inch misalignment across a row becomes visually obvious once hooks are loaded unevenly.
- Apply a small dot of blue threadlocker on each mounting screw to prevent slow loosening from repeated hook insertion and removal.
- Paint the wall behind your pegboard a contrasting color before installation; the visible gap creates a deliberate depth effect that reads as intentional design rather than utility storage.
- Install a French cleat strip along the top edge of your pegboard row so you can hang framed art, small shelves, or planters above without additional drilling.
What's inside
A well-mounted pegboard transforms dead wall space into a living, adaptable storage surface that evolves with you. Whether you’re corralling garage chaos, building a kitchen herb-and-utensil station, or giving a craft room real visual structure, the mounting method you choose determines whether the result looks intentional or like a temporary afterthought. This guide walks you through every decision — material, layout, hardware, spacing, and finishing — so your pegboard sits flush, holds heavy, and actually looks good doing it.
We tested and compared today’s most popular options, including full kits and standalone mounting hardware, to surface what genuinely matters. Below you’ll find our curated recommendations, followed by a step-by-step breakdown you can follow regardless of skill level.
As an Amazon Associate we earn from qualifying purchases.


Choose the Right Material: Steel vs. Composite
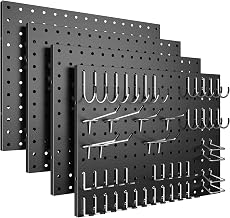
Metal pegboard panels have overtaken the old hardboard standard for good reason. Steel options like the Wall Control 30-P-3232GV Galvanized Steel Pegboard Pack resist moisture, don’t warp under load, and accept a wider range of hook styles. Fiberglass-coated steel panels — the kind found in the Spampur 4-Pack Metal Pegboard Panels — add a powder-coated finish that resists chips and comes in clean matte colors, making them viable in visible living spaces rather than just utility zones. If budget is the primary constraint, hardboard still works for lightweight items like keys and scissors, but it sags with real weight and degrades in humid environments. For anything that will live in a garage, kitchen, or workshop, steel is worth the modest price premium.
Plan Your Layout Before You Drill
Hold panels against the wall and mark positions with painter’s tape. Account for vertical stud spacing — most residential walls have studs at 16 inches on center — because screwing into studs gives you a dramatically stronger anchor than drywall anchors alone. Lay out your panels so that edges land near or on a stud. For a clean, modular look, keep consistent gaps between panels (half an inch to an inch works visually) and leave room along the bottom edge for clearance above countertops or workbenches. Sketch out where your most-used hooks and accessories will go so you don’t end up with a panel buried behind a cabinet or too high to reach comfortably.
Mounting with Spacers: The Non-Negotiable Step
This is where most first-timers stumble. Pegboard hooks need clearance behind the panel to loop through and grip. Without spacers, hooks can’t engage properly and will pull away from the wall under load. A dedicated mounting kit like the Hotop 24-Set Pegboard Spacers Kit provides screws, washers, and standoffs sized for both 1/8-inch and 1/4-inch boards. Position a spacer at each panel corner plus the center — five anchor points per standard 16-by-16-inch panel — and drive screws through the spacer into the stud or a rated wall anchor. Tighten firmly but don’t crush the spacer; you want roughly a half-inch of consistent gap between the panel back and the wall surface.
Securing to Studs vs. Anchors
Whenever possible, drive at least two screws per panel directly into wall studs. Studs handle repeated loading and hooking cycles without loosening. For panel positions that fall between studs, use toggle bolt anchors rated for at least 50 pounds each — plastic drywall anchors are inadequate for a pegboard that will hold tools, pots, or supplies. The INCLY 48-by-36-Inch Metal Peg Board Kit ships with mounting hardware rated for heavy garage use and covers a large enough area that you can span multiple studs in one installation. For smaller setups like the 4-Piece Metal Pegboard Wall Panels set, two studs and two toggle anchors per panel will keep everything rock solid.
Finishing and Organizing
Once panels are mounted, step back and assess before filling every hole. Start with your heaviest or most frequently grabbed items and work outward. Group items by function — paint supplies together, cooking tools together — and leave some open grid space for future needs. Matching your hook accessories to the panel brand matters: Wall Control panels use a proprietary slot system that isn’t cross-compatible with standard round-peg hooks, while most metal pegboard panels from Spampur and others accept universal 1/4-inch peg hooks. Confirm compatibility before buying a bulk hook set.
Tips
- Use a laser level to align multiple panels horizontally — even a quarter-inch misalignment across a row becomes visually obvious once hooks are loaded unevenly.
- Apply a small dot of blue threadlocker on each mounting screw to prevent slow loosening from repeated hook insertion and removal.
- Paint the wall behind your pegboard a contrasting color before installation; the visible gap creates a deliberate depth effect that reads as intentional design rather than utility storage.
- Install a French cleat strip along the top edge of your pegboard row so you can hang framed art, small shelves, or planters above without additional drilling.
Frequently Asked Questions
Can I mount pegboard directly over existing wallpaper?
Yes, but only if the wallpaper is firmly adhered with no bubbling or peeling edges. Spacers create enough standoff that minor surface irregularities won’t matter. If the wallpaper is loose, strip it in the mounting zone first — screws driven through failing wallpaper will pull free over time.
How much weight can a properly mounted steel pegboard hold per hook?
A standard 1/4-inch steel peg hook inserted into a steel panel mounted to studs typically supports 10 to 15 pounds without deforming the panel. Distribute heavy items across multiple hooks and avoid concentrating load on a single hole row.
Do I need special tools for metal pegboard installation?
A drill, a stud finder, a level, and a Phillips or hex driver handle 90 percent of installations. Metal panels may require a metal-cutting blade or step bit if you need to add custom hole positions, but factory-drilled panels from brands like Wall Control and Spampur rarely need modification.
What’s the best way to hide mounting gaps in a living room setting?
Mount the pegboard on a painted backer board — a thin sheet of birch plywood cut to the same dimensions, stained or painted to match your room. Screw the backer board to the wall first, then mount the pegboard onto the backer with short screws. The result reads as a deliberate wall feature with no visible spacers or wall gaps.
Conclusion
A pegboard installation is one of the rare home upgrades where function and aesthetics genuinely overlap — but only if you respect the fundamentals of material choice, stud mounting, and proper spacing. Follow the steps above, invest in decent hardware, and your pegboard will hold up for years while looking like it belongs exactly where it is.